
So, summer’s here and you have a whopping two (or three) dozen Chromebooks to store long term over the summer in your classroom.
If you’re already tight on space and just don’t have the room to stack these laptops on top of each other without them toppling over (and coming out of your paycheck), you’ll be glad to know that there are plenty of solutions.
These Chromebook storage tips will keep your stacks of laptops safe from damage, dust, and keep the battery life optimized in an organized fashion.
You’ll learn:
- The proper way to store a Chromebook long term over the summer
- The max stacking height
- Whether or not you should keep them charged in storage, or power cycle the battery
- How to protect them from temperature fluctuations, sunlight, dust, and more
- DIY storage organizers, holders, and carts for summer storage
- And more
Sound good? Let’s get those Chromebooks organized.
How to store Chromebooks long-term

Whether you’re a teacher, school admin, or just an individual that needs to put their Chromebook away for an extended period (like over the summer), there are right and wrong ways to do this.
Doing it the right way will keep your device in pristine condition and preserve the battery’s performance for when you need it again.
Doing it the wrong way will degrade the battery and wear down your Chromebook until it doesn’t hold a charge anymore. That’s why it’s important to store it correctly.
While simply tossing it into a cabinet and locking it shut may work, but it’s not optimal and ends up depreciating your device.
Here’s the TL;DR version:
To properly store a Chromebook, there are two main things to keep in mind:
- Keep it cool
- Preserve the battery
Keeping it out of sunlight and storing it in a cool, dry place (does this sound like food storage yet?) will protect the electrical components from being damaged by heat and UV.
The heat will degrade electronics faster than normal “wear and tear.” In my opinion, that’s what wear and tear is. It all comes from regular usage and the heat generated by the components, which destroys them over time.
Normal usage heats up the parts and expands them. Then they cool and contract. This repeats over and over and wears the components such as the CPU, RAM, SSD, and battery.
The battery is the most susceptible to damage if not stored properly.
Your Chromebook’s battery powers the entire device (literally) and you’ll want to take measures to preserve it when not in use.
Don’t store it the wrong way- this will damage the battery which results in slow charging, quick discharging, rapid drops in battery percentage remaining, a hot battery, or poor charging capacity (can’t hold a charge).
That’s why there’s a slow discharge mode, which not many people know about. Some people even go as far as taking the battery out and putting it into the fridge!
If you know how to do both of these already, then you’re all set. If not, then keep reading as we’ll cover these topics for long term storage and more.
Max stacking height
According to Google’s recommendations, the maximum number of Chromebook units you should stack on top of each other is 7.
Although the frame is plastic and can withstand minor bumps and drops, when you stack more and more units, the Chromebook at the bottom of the tower can become warped or damaged.
The screen is extremely sensitive and this could lead to screen damage, horizontal or vertical lines across the screen, or pixel damage.
The more you stack also allows possible damage from knocking them over or toppling accidentally.
Sure, stacking saves space. But it’s not worth blowing up a few hundred dollars worth of technology to do so. If you need to stack, keep reading for tips on making your own stackable DIY Chromebook storage.
Store at the proper temperature
Temperature is a HUGE component to maximizing the life of Chromebooks.
Sadly, most people ignore this and practice all the wrong behaviors to keep their laptops in good shape.
After hours of usage, five times a week, the wear and tear on a Chromebook reduces the usable life of it drastically. Making small changes can easily improve the usability of it by a significant margin over time.
In a nutshell, you want to always keep the operating temperature as low as possible DURING and AFTER use.
The heat will kill electrical components much faster than everyday usage, so keeping the temperature low benefits the device overall.
Zoom meetings, Google Classroom, and educational apps all are power-hungry and produce a lot of heat.
Depending on your classroom activities, there’s not much (and no sense) in “stopping” usage of the laptop during the session just to let it cool down.
However, after being used for hours, rather than putting them into storage right away, give them about 30 minutes to cool down. If you use a Chromebook holder that confines them in an area with low air circulation, avoid that.
Leave them out in the open or on the student desks for 30 minutes to normalize the temperatures. THEN put them back into storage. If you have open-air storage, this is much more efficient for bringing down the temperatures quickly.
When not in use for extended periods of time (such as over the summer), you can protect them by keeping them out of direct sunlight. If your storage organizer faces the sun, use a tarp or other sun-shielding material to protect the Chromebooks.
Otherwise, keep them secure in an organizer that doesn’t heat up from the sun.
Classrooms that run AC over the summer or on hot days should fare just fine- just make sure the sunlight’s UV rays don’t shine directly on the storage compartment.
And if you’re interested, here’s an article on keeping temperatures down to extend the battery’s performance.
Or if you have the disposable budget, consider getting a laptop cooler to keep them running cool at all times.
But a teacher can dream, right?
Battery storage
Properly storing the battery for long periods will maximize battery life and performance.
There’s a whole science behind this and I’ll spare you details because I could write a whole post of JUST battery storage (in fact, I did).
If you’re planning to store your Chromebook over the summer or for a long time, follow these storage tips to save the battery.
If you plan to store your Chromebook for less than a month:
- Charge your Chromebook unit to 80% before storing it
- Don’t charge it to more than 80% of the battery’s capacity
- Don’t let the battery fully discharge (drop to 0%) during storage
- Put the Chromebook into slow discharge mode
- Keep it out of direct sunlight
If you need to store your Chromebook fro more than a month:
- Charge it to 80% before storage
- Let the battery completely drain and charge it to 100% at least once a month (also known as a power cycle)
- Keep the battery partially charged at 80% if you’re not doing a power cycle, which helps preserve battery performance
- You may need to “top off” the battery to bring it back up to 80% if it degrades or loses its charge quickly
- Don’t let it completely discharge
- Put the Chromebook into slow discharge mode
- Keep it out of direct sunlight
- Don’t leave them plugged in and always charging
These tips will help keep the batteries running smoothly and retain their charge capacity for the next class session.
Optimize battery life
You can further optimize the battery performance by following these tips. The key is to always keep a partial charge (never completely charged and never complete discharged) and keep the unit cool.
Both of these practices keep your battery healthy and extend the useful life out of it so your students can benefit.
Partial charging
Keeping the battery partially charged is optimal for extended storage.
This will minimize degradation and ensures that it has enough power for the next time you turn it back on. If you plan to store it for a year or longer, consider doing power cycles monthly or removing the battery for storage.
Removing the battery
Some people will remove the battery from the Chromebook entirely for long term storage (several months).
This is ideal because the system can’t extract any juice from the battery and keeps it completely powered off. The battery can be placed into an airtight bag and stored in a cooler.
Of course, this isn’t practical for dozens upon dozens of Chromebooks.
Plus, opening the unit and disassembling the battery voids the warranty.
However, if you’re just one person and you want to put your Chromebook on the shelf for some time, this may be worthy of your consideration.
This isn’t necessary for everyone and the benefits of taking out the battery aren’t significant.
Replacing the battery
If the battery reaches the point where it’s no longer usable, the battery can be swapped out for a new one rather than recycling the entire Chromebook.
Battery replacements are available from the manufacturers (OEM parts), or you can use a third-party generic battery. If your Chromebook is relatively new, you may be able to replace it under warranty from the manufacturer or retail store you bought it from.
Dust protection
It’s difficult to fully protect any electronic devices from dust.
Thankfully, Chromebooks are fanless and dissipate heat directly through under panel heat vents passively. This eliminates the need to clean the fans as they’re magnets for particles.
However, these vents are also a way for dust to get into the system.
Depending on the model you have, some are MIL-SPEC for dust-proof design so they’re resistant to any fibers getting into the unit.
But the majority of Chromebooks aren’t. So chances are that you’ll want to take some measure to safeguard them from foreign objects entering the heat vents.
Here are a few ways you can minimize dust getting into your Chromebook:
- Store it in a plastic or stackable organizer that shuts or closes
- Place the Chromebook right-side-up so the dust vents are facing DOWN
- Put the device on top of a microfiber cloth as it’ll catch any dust fibers that float by
- Use compressed air to regularly blow out the dust vents
- For long term or over summer storage, tape the dust vents with scotch tape, but be sure to remove it when you use it again
There are also tons of Chromebook sleeves and shells that is made to protect it from dust, water, bumps, and drops.
Storing chargers and cables
The chargers and power bricks are a nightmare.
When you have two dozen Chromebook units, they each need their companion charger cables so it doubles the work. The easy way is to stuff them all into a safe storage unit, like a plastic storage bin.
If your classroom uses the same model, it doesn’t matter if the charger cables get mixed up.
They can be swapped and used interchangeably.
But if you have different models, you’ll want to keep them separate and organized. You can place them in different storage holders or you can color-code them with colored packing tape.
Cable tangling can be avoided by wrapping the cable around the power brick and tying it together or taping it.
You can also pack each charger with the Chromebook unit so it’s one compartment per Chromebook and cable pair.
Put the Chromebook into a slow discharge
As you know by now, the battery is the main component you’ll want to protect during long term storage in the home or classroom.
Since most students are out of school during the summer for summer vacation, this two-month gap is the lengthiest period of time most Chromebooks will go unused. This can save the battery for expensive units and reduce the overhead of replacing devices for the new school year.
(Need new laptops anyway? Consider suggesting these Chromebook with the best battery life).
You’ll want to keep temperatures controlled and batteries on slow discharge.
Don’t charge the battery to 100% capacity, and don’t keep it plugged in. Both of these do more harm than good and will degrade battery performance over time.
You can put the Chromebooks into slow discharge mode by doing the following:
- Plug the unit into a charger.
- Turn on the Chromebook.
- After it boots up (goes to the login page), press “Refresh + Power” simultaneously and hold them.
- With both keys pressed, disconnect the charging cable. You may need a helper to do this if you can’t hold down the keys and pull the power cable at the same time.
- Release both keys.
That’ll put the device into a special state of slow discharge. I believe it’s what they’re preconfigured to when they box them up out of the factory to the end consumer (to save the battery) because mine wouldn’t turn on until I plugged it in.
This mode keeps the battery drain extremely low and holds a charge for an extended period. It’s perfect for storing Chromebooks when they won’t be used for a long time and preserves the battery.
You’ll know if you did it right by the Chromebook shutting down automatically and staying off. If you hit the Power button, it shouldn’t turn on.
The same goes for opening the lid- the device remains off and doesn’t power on.
How to get the Chromebook out of slow discharge
To disable it and wake up your device, just plug in the power cable and charge it like usual.
Your Chromebook will automatically leave slow discharge and can be powered on by pressing the Power button.
Update Chrome OS
After a long time in storage, you’ll want to make sure you’re running the newest version of Chrome OS.
For schools and classrooms, you’ll likely be running Chrome Enterprise.
You’ll be downloading a series of updates as soon as you connect to WiFi, depending on how many were released during the time the Chromebook was off.
And yes, this needs to be done to EACH Chromebook.
So it’s much faster if you boot them up, get them connected to WiFi, and then start downloading updates as soon as you can.
Don’t wait for one to finish before you start the next. You can check the update schedule for Enterprise here to see how many you should expect.
If you’re using a personal Chromebook, it’ll start automatically downloading the update after you power it on. This may take a few minutes, but you’ll get the notification that a new update is available.
Just restart it to get the update.
DIY Chromebook storage
There are a TON of space-saving DIY Chromebook organizers for your classroom you can utilize.
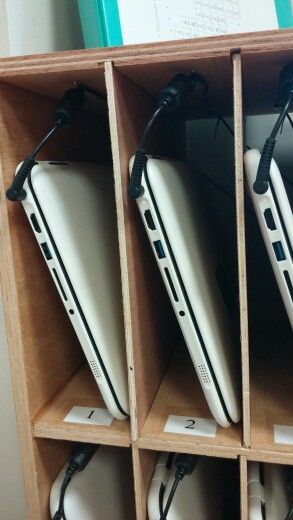
The most popular option is using cubbies as Chromebook holders that you can label with numbers or student names.
Some are extra fancy and have built-in charging stations so they can power up the battery while they sit in the DIY classroom storage. If your school doesn’t provide them or offers you the freedom to build your storage station, you have plenty of options.
Here are some quick ideas.
DIY dish dryer Chromebook holder
Use dish dryer racks that fit the length of the Chromebook to easily hold them vertically and keep them apart.
This approach is very popular among budget-friendly classrooms and is the ultimate DIY approach. It holds each unit by itself and separates them for heat dissipation. It’s also secure and very easy to shelf and remove each Chromebook from storage.
A few dryer racks can hold a dozen or so Chromebook and also spaces them so they don’t scratch each other.
There are hundreds of dish racks on the market and you don’t need to spend a lot to get a good one.
Pro tip: You can buy expandable ones to fit your device size snuggly so it holds in place, such as this iPEGTOP expandable dish rack (via Amazon).
Or, you can build something like this:
Use storage crates
These crates have the perforations around the edges.
You can attach some kind of plastic that spans across the length of the crate to keep the laptops each individualized into their own compartment.
You can also use a charging station because the holes in the crate make it easy to loop through cables and wires.
Use a filing cabinet
This one’s super simple, but tends to break if not reinforced. You can use filing folders and secure them with packing tape around the edges.
Some folders are durable and made with heavy-duty materials, which is preferable to hold the Chromebooks securely.
The nice thing about using a cabinet is that the laptops can be tucked away and protected from dust, sunlight, and spills when you use this DIY solution.
You can use any old basic filing cabinet paired with generic hanging file folders.
Here’s a sample set that I found that’ll fit letter-sized Chromebooks:
- 2 drawer file cabinet with lock (via Amazon)
- Letter size hanging file folders (8.5 x 11″) (via Amazon)
Remember, the length is what matters most. The point is to fit each Chromebook snuggly into each file organizer to separate them.
Do some measurements on the length of the laptops you use and see if they’ll fit.
Use plastic organizers
There are clear plastic organizers that are stackable and allow you to build a tower of Chromebooks.
You can stack as high as you can go (but just make sure it’s secure) and each device will be confined to its own compartment. I’d suggest drilling some holes in each one so that the device can cool off after being used to preserve and maximize the battery life.
You can also easily rig up a charging station to this and make sure each Chromebook will be charged while in storage.
Here are a few products that can provide vertical storage for your classroom’s devices:
Use a paper filer
There are these handy little plastic paper storage shelves that have built-in “bookends” which can be used as separate compartments as Chromebook holders.
You can buy them in racks of 8-12 and easily put two or more together so it looks like one long storage rack.
There are no ends to block the Chromebooks from falling out if you push it in too far though, so it’s best used against a wall.
Setting up a charging station is also very easy with this setup because it uses minimal components. You can check them out on amazon here.
Get a professional laptop holder with a charging station
Then there are the commercial solutions.
There are plenty of options to choose from and you’ll want to choose wisely. Consider how many laptops you need to store, whether or not you need a charging station, and if you want them to be locked up.
Do some research and see what fits your classroom’s needs and choose accordingly.
- For example, if you just have a dozen or so Chromebook, you may get away with a budget storage rack, like this Belkin Store and Charge (via Amazon).
- Or if you need more storage, complete with a locking door and rolling wheels, you can utilize something like this 30-bay laptop cabinet from ECR4Kids (via Amazon).
Consider a Chromebook cart with a built-in charging station
For those who don’t have time for DIY projects, there are readily built laptop carts available- complete with racks to hold the devices vertically, vent holes to release heat, and built-in charging stations.
Some have closing doors equipped with a lock for security, while others are just torso-height carts with a free design. It really depends on the look and feel you want for your classroom and students.
- For larger classrooms, you can grab a professional laptop storage cart, complete with chargers and locking doors with wheel: Tripp Lite 32-port charging cart (via Amazon).
- Or you can snag a simpler and basic one that just has the basics to safely store your devices: 32 bay storage by Pearington (via Amazon).
Did you enjoy those Chromebook storage tips?
Whether you’re the school tech admin or a teacher, everyone needs an efficient way to store all those Chromebooks- especially if you’re a 1:1 laptop to a student district.
I hope these tips outlined throughout this article have helped you out and spurred your mind with ideas. You should now be able to safely store your classroom’s Chromebooks in a neat and organized fashion while protecting the battery and keeping it safe from the elements.
If you have any questions or tips to share with other teachers, please leave a comment below!
Or if you found this page helpful, consider telling another teacher who may get some use out of it.
Thanks for reading!

")
")
")