
So, you need to replace your Chromebook’s battery.
In this tutorial, I’ll show you the general steps of doing so.
Keep in mind that every single Chromebook laptop setup is slightly different, so these steps may aren’t to be exactly followed as written- they’ll vary depending on your Chromebook specifically.
After this, you’ll have a fresh new battery that holds a charge and will last much longer than your older battery.
Sound good?
Let’s roll!
Last update: 1/3/22. The process of swapping out a battery ain’t changing anytime soon.
How to replace your Chromebook’s battery

Replacing the battery is a pretty straightforward process, give or take a few variations each model.
Over time, the battery will slowly degrade. You’ll notice that it doesn’t hold as much of a charge. It may drain quicker, charge slower, or have random jumps in the battery remaining.
There’s no need to trash or sell your Chromebook! You can replace the battery yourself with an OEM or third-party brand.
Or you can take it to a computer repair shop near you. Pros can easily swap it out (recommended if you don’t know what you’re doing– battery replacement can be dangerous as with any electronics). You can end up dealing with electrical shock, discharge, or outright destroying your device if you’re not careful. Seriously. Do NOT proceed if you’re uncertain about how to replace it.
Just like cars, each laptop’s process is a little different, but with some common sense and research (and this guide), you should do just fine! Remember, you can leave a comment if you have any questions and I’ll try to assist (for free!).
Battery replacement sounds scarier than it is. But once you do it for the first time, you’ll be saving yourself cash for every new laptop you buy in the future.
No more worrying about charge cycles or best practices for battery preservation (though it doesn’t hurt to do them!)
Regardless, you can kind of see the process of replacing a Chromebook battery if you’re thinking of doing so.
Sometimes you may be on the fence about replacing a battery yourself, sending it in for repairs, or possibly even just buying a new one.
If your battery if the only part that needs to be replaced, it’s much cheaper to just replace that instead of buying a new Chromebook.
However, if you do decide to DIY it, it’ll void the warranty.
So consider the warranty of your device before attempting to swap the battery:
- If your Chromebook is still covered under warranty, it’s always better to send it in for repairs and get it professionally done.
- If your Chromebook is out of warranty, it’s cheaper to buy a replacement battery and do it yourself compared to sending it in or buying a new one.
- Be sure to check for extended warranties from the retailer, as some places have these nice warranties for a cheap price that you may have purchased with your device.
- Some retailers also offer free extended warranties.
- Some credit cards also cover hardware failure and other damages, though this is only with a few providers
When to replace the battery – and should you?

Readers often ask the following questions regarding their battery:
- “Do I need to replace my Chromebook battery?”
- “Should I replace it at all or just buy a new one?”
- “Is it worth it to replace the battery?”
So I compiled this list of common symptoms when you should definitely consider getting a new battery.
These are signs of a battery that needs to be replaced on a Chromebook:
- The battery doesn’t hold a charge
- The battery life has been reduced
- Battery drains quickly
- Battery percentage is inaccurate or “jumps” percentages
- The Chromebook shuts off unexpectedly
- The Chromebook shows the “low battery” warning out of nowhere
- Chromebook doesn’t charge, or charges very slowly
- Chromebook doesn’t charge all the way
If you see any of these signs, you may need to replace the battery. Thankfully, it’s not super difficult.
Here’s how!
Disconnect all power and drain the Chromebook’s battery complete

This would be the most obvious step.
You’ll want to be safe and free from electrical discharges when you do this kind of thing. So to ensure a safe procedure, here’s what you can do to minimize the risk of elocution:
Use your Chromebook until the battery is completely drained. Need to drain it faster? Try playing multiple videos at the same time, turning the brightness all the way up, and playing a game at the same time. This should drain the battery very quickly.
If it takes a long time, just let it idle while doing that. Change your Chromebook sleep settings so it doesn’t automatically shut down.
After the battery is drained, you’ll want to push the power button a few times. Push it and hold it for ten seconds, at least three times. This will drain the battery even more on the motherboard side.
When this is completed, the next step is to find a discharge-free area. What this means is you’ll want to find an area or workstation where you won’t accidentally “shock” your Chromebook. Even the slight ets electrical discharge can completely destroy a component on your machine.
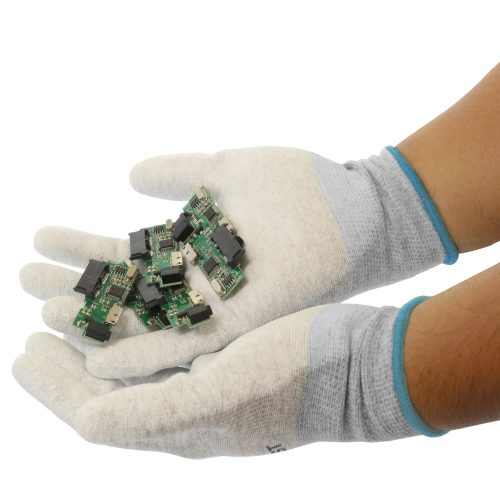
For this, I highly recommend getting yourself a pair of electrical gloves (ESD gloves) and an electrical mat:
- The pair I use is the Milcoast anti-static ESD work gloves. They’re decently cheap and work just fine. (See on Amazon.)
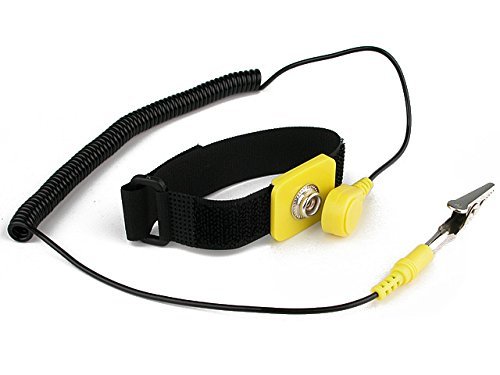
- Alternatively, you can just use a wrist band to prevent electrical discharge. Rosewill makes an excellent one that costs next-to-nothing. (See on Amazon.)
- For the electrical mat, I just use a basic one by iFixit. They make some decent stuff geared towards everyday people like you and I. (See on Amazon.)

Again, these are all optional. You don’t have to buy any of them. But worthy considerations if you don’t want to screw up your laptop by electrical discharge.
If you’re cheap, you can use a solid wood surface and discharge yourself by touching the nearest metal object. Be sure to do this though, and be extra careful since you’re not using any protective gear.
What you’ll need
Next, we’ll need to get a set of tools ready so you don’t have to stop during the process to find tools (how annoying is that?).
To replace a Chromebook battery, you’ll need the following tools:
- A basic Philips screwdriver that can remove (#0) Philips screws (the small ones)
- A knife (any pocket knife will do)
- A spudger to pry out the parts (you can buy one here on Amazon)
- 2 small containers to collect the screws/parts as you teardown your Chromebook (optional, but handy)
- New Chromebook battery
- Anti-static mat (optional)
- Anti-static gloves (optional)
If you plan to do this often, or if you have absolutely no tools, I suggest checking out the XOOL 80-in-1 kit. It’ll have everything you need, it’s cheap, and it works. You can check it out on Amazon.
Although the anti-static mat and gloves are optional, they’re highly recommended so you don’t destroy your whole system by static discharge.
Note that this may vary depending on the specific Chromebook you have, but for the most part, this should be all you need.
Also note that these parts are sharp and you can easily harm yourself, so take caution and exercise common sense!
So now that we have some anti-static gloves, and anti-static mat, and some basic tools for the job, it’s time to start prying your laptop apart and swapping out that old battery for a new one on your Chromebook!
Where to buy a replacement battery

This question comes up a lot from readers, so I thought I’d add in this section.
When you want to buy a battery to replace the current one, you’re best off going for original parts from the manufacturer- specifically OEM parts. Usually, the easiest way to find these parts is to do a search for your Chromebook model and battery.
For example, if you have an Acer Chromebook CB3-131, you’d do this:
- Launch your favorite web browser (Chrome, Firefox, Edge, etc.)
- Type in “acer chromebook cb3-131 battery oem”
- Scan the search results and find one that seems to be from a reputable seller.
Because there are a ton of Chromebook makers and they each have different designs, you won’t find a “universal” battery that fits all. One size does NOT fit all. Just like car batteries, each Chromebook battery requires a different fit.
Do your research and check battery compatibility
So it’s up to you to do the research, find the right battery that’s compatible with your Chromebook, and order it. Perhaps with a return policy in case you buy the wrong one.
Typically, you can find third-party sellers on sites like Amazon and Ebay. If you can find the battery straight from the manufacturer, in this example straight from Acer, that would be ideal.
But do your research just as you would when shopping for anything online- read reviews, compare prices, and look at return policies. Also contact the seller and see if it works with your Chromebook model. Most sellers will list what Chromebook models the battery works for.
It’s entirely possible for one batter to work with a few different models i the same series from a specific manufacturer (sometimes even from different brands) should they all be using the same battery type.
I may be able to help you out in choosing the right battery as a replacement- just leave a comment and I’ll try to reply ASAP.
So once you find the right battery for your Chromebook, it’s time to start swapping out the old one and installing the new one.
Swapping the battery and your warranty
Just a heads-up, doing this process will void your manufacturer’s warranty with your Chromebook.
So before you do this, think about whether it’s more worth it to send in your Chromebook for repairs from the manufacturer, or doing it yourself. If the warranty is still valid, it may be cheaper to just send it in for repairs.
If it’s out of warranty, you can also consider buying a new one or just replacing the battery. But if you’re here, you’re probably here to replace the battery yourself- DIY style.
Most Chromebook warranties last for one year. Depending on when you bought it, you may be able to send it in. Be careful of shipping fees though. That’s also something to consider.
Disassembling the Chromebook

Okay, so now that we have everything setup for this process, we’re ready to start disabling your Chromebook.
How to disassemble a typical Chromebook (teardown)
Warning: This is where the teardown will take place. Be sure that there’s no active power going to the Chromebook.
Exercise caution and common sense when working with electronics. You may end up shocking yourself, or completely destroying the internal components of your laptop!
Make sure you’re not wearing double-layers of clothing, and that you’re not working on carpet to minimize the chance and electrostatic discharge.
By proceeding, you’ve read and agreed that you’ll be careful and that you’re fully responsible for your own safety, your Chromebook’s safety, and your Chromebook’s warranty! You assume all consequences and understand the risk of disabling your Chromebook, and bear all responsibility for doing so.
Now that we got the legal jargon out of the way, let’s take apart your laptop and swap the battery.
Step 1: Prep your work area
Lay down your anti-static mat and put on your anti-static gloves.
Attach the grounding rods as needed. Touch a piece of metal with both hands.
After you’ve discharged yourself, go ahead and grab the screwdriver.
Step 2: Remove the screws, feet pads, and hidden screws
A simple Philips screwdriver will easily take out the visible Philips screws (#0). There are usually about 4 or 5 of them going in a circular motion on the bottom panel.
After you remove those, take off the rubber feet, one by one. You’ll notice hidden screws under each pad. Remove these screws also.
Hint: If you’re having trouble removing the rubber pads on the bottom of your Chromebook, use a knife to partially pry them out.
Note that once the feet are removed, you’ll have to reglue them back on to make them stay. If you’re good enough, you can partially pry the feet, remove the screw, and then put the feet back into place without having to re-glue them. Though, this depends on the model you have and the size of the pad.
Step 3: Remove the rear hinges
Look on the back piece of your Chromebook. In other words, where the hinges are.
If you have a laptop where the hinges are secured, you may want to disassemble this piece before taking off the bottom panel- or else it may snap.
Scan the computer around the bottom panel and make sure all the screw are removed.
Also look for various clips or hinges that are holding the panel attached to the laptop. Remove any parts before proceeding, or else you may snap something off.
Step 4: Remove any additional hinges, screws, or clips
Take out your spudger and start to “unclick” all the pieces in the rear, such as the clips that are holding the panel attached to the laptop.
Go slowly, one clip at a time, and unclip them. Start at the hinge area and make yourself around the laptop.
Be careful not to miss any clips, or else you’ll easily snap them off during the disassembly. This part will take some time, but each clip will come out without too much force.
After you’ve used your spudger and made your way around, try to pull the bottom panel off by hand. If you can’t or it seems like it’s still attached somewhere, stop.
Then go back and examine the issue:
- Did you miss a screw?
- Did you miss a hidden screw?
- Could you have skimmed over a hinge clip?
- Did you miss a regular clip?
- Did you miss some other attachment?
- Are there any other hinges or clips holding the laptop together that need to be removed?
When everything is removed properly, the panel should come off without too much force. Don’t try to force it apart- you’ll snap something.
Step 5: Remove the old battery
After you’ve taken the panel off, you’ll see the battery first thing.
It looks like a giant, rectangular piece and should be the first thing you see when you pry it open. There should be a bunch of letterings, marking, and symbols all over it.
The battery will also say something on it like “rechargeable Li-Polymer Battery” with a wattage rating. It should be fairly obvious as it looks definitely like a giant, flat, rectangular slab.
The battery will be held in place by a few screws going around it. Remove these screws and place them in a separate container- apart from your panel screws so you don’t get confused when reassembling the Chromebook.
After the screws are removed, you can grab the battery by hand, and use the knife if needed to pry it out. It should come out pretty easily. Remove the battery from the battery connector safely. Set the battery aside.
Step 6: Install the new battery
Get your new replacement battery you bought.
Connect it to the battery connector in the same fashion the previous battery was connected. Make sure it’s securely connected and in the proper form. You don’t want to have a loose battery connector, as this can performance issues or even pose a fire/shock hazard.
Double-check that you put the thing back together properly. You really don’t want to screw up here. So be sure that you reassembled back how you disassembled it. Don’t skip anything. Do it right!
Place the connected battery back into the seat as how the previous battery was seated. Grab the battery screws and screw the battery back into place. Verify that it’s fastened.
Step 7: Reassemble the Chromebook
Grab the bottom panel, and work your way around the clips to clip it back into place. If you broke some clips, you should be okay. You can always use some other adhesive or glue to hold it back together if it’s loose and your Chromebook is falling apart on you.
Reattached any hinges or other holders that you’ve removed in the same fashion.
Screw the bottom panel back on. After you’ve screwed the hidden screws back on, you’ll need to glue the rubber feet back on if they’re not sticky anymore. If you were able to remove the hidden screws without taking off the feet, you should be able to just give them a few firm presses and they’ll stick back on.
You’re done! Make sure you didn’t miss any screws (this is why a container is handy). Clean up.
Step 8: Charge it up!
Plug your Chromebook back into the charger and give it a full charge!
The status indicator light should warm up amber and charge until it turns blue to maximize battery life.
When it’s done charging, unplug it from the charger and turn it on.
Log into your Chromebook and take a peek at the battery percentage. It should be 100%. As you use the Chromebook like normal, you should see a marked improvement over the previous battery, as you’ve now swapped out your battery- DIY style!
Here’s a video of a typical teardown you can reference:
Maximizing battery life and performance
There are a few basic things you can do to get the most performance out of your new Chromebook battery.
Here are a few things to practice if you want to maximize your battery performance of your Chromebook:
Power cycle your battery
Let your Chromebook’s battery fully drain the first few charge cycles. Then charge it back to 100%. Then use it back to 0% until it shuts off. Do this for the first few 3 charge cycles to utilize the entire battery reserve. This is a power cycle.
After the battery is cycled when it’s new, try to keep it partially charged from now on. Try not to charge it fully and don’t let it completely drain. Charge it here and there to keep it around 50% charged.
At least once a month, power cycle it, but not more than once a month.
Keep it cool
Don’t always run your Chromebook to the maximum CPU usage.
Chromebooks get hot under stressful tasks, and the heat is what kills the battery. This depends on your usage and lifestyle. Sometimes you can shut down apps, games, tabs, music, movies, etc. that are just running in the background. This will reduce battery usage, speed up your Chromebook, and also generate less heat.
If you plan to not use it for an extended time, remove the battery, place it in a zipper bag, and put it in the fridge. Remember to let it warm to room temperature when you’re ready to use it again.
Other ways to take care of your battery
- Don’t use the laptop while it’s charging, charge, unplug, then use.
- Don’t charge the laptop immediately after using it. Let it cool down first, then charge.
- Don’t charge the Chromebook in hot environments.
If you’re still in need of a Chromebook with a battery that’ll last you for days, you may want to consider getting one that exactly suits that purpose.
Looking for a Chromebook that’ll last you all day? Check out this buyer’s guide of the Chromebooks with the best battery life.
Did you replace your Chromebook battery?

Well, that’s about it.
Replacing your battery is pretty much a straightforward process, give or take a few adjustments you’ll need here and there depending on your Chromebook model. Regardless, if you have any particular step that you’re stuck on, just leave a comment and I’ll get back to you ASAP.
Otherwise, if you’ve done this process before and have some words of wisdom, leave them in the comment also!
Now that you’ve learned how to replace your Chromebook’s battery, you no longer have to suffer from a fast-draining battery, random shut offs/restarts, low battery percentages, slow charging speeds, annoying battery messages, and other various battery-related problems!
If you’ve found this tutorial to be helpful, let me know by leaving a comment. That’s the best you could do! Remember, if you’re stuck, let me know stating the problem in detail- then, I’ll try to help out ASAP!
Thanks for reading!
")
")
")

Thanks for settling a disagreement between me and my brother about the cycling phase.
I win. He has to buy pizza for us tonight.
Great tutorial Andy! THANK YOU!
Great tutorial Andy! Thank you!