Chromebooks don’t have the most storage in the world, and you probably knew that when you bought it.
They’re built as an extremely portable laptop, where you store and save most of your images, videos, and work in the cloud. Specifically, Google Drive.
That’s why you get a free promotional offer from Drive when you purchase a new Chromebook.
In Google’s vision, they want you to save all your stuff in the cloud so you can access it anywhere without taking up space on your laptop.
[the_ad id=”2478″]But some of us don’t want to use the cloud. We’re paranoid. We’re not technically literate. Or we just don’t want to deal with uploading and downloading.
Thankfully, you can easily use your basic storage options that you’re already used to. I’m talking about USB goodness, like flash storage, SD cards, and external storage.
Most variants come with either 16 or 32GB of storage space. If you save a lot of stuff from the Internet, this can burn up your space quickly.
So, you’ll need to save your files locally on another device if you don’t want to use Google Drive or any cloud service for that matter.
They have both USB ports and SD card slots. This makes the process of transferring your stuff to a thumb drive or hard drive very easy.
But, have you tried connecting a USB-powered device to your Chromebook yet? What happened when you plugged in it?
Nothing.
No messages. No warnings. No prompts.
What’s going on?
We’ll figure it all out here. Let’s get started.
Last updated: 6/27/17.
Format file systems supported by Chromebooks
Note: The following paragraphs cover hard drive file types. The following instructions also apply to SD cards and thumb drives (or flash storage). I’ll just be using a regular plain old external hard drive as an example.
Chrome OS actually supports a huge range of file types from your external drive. Whether you’re importing from your storage or saving to it, it works both ways.
Your laptop can import and export (read and write) to the NTFS file system that Windows uses, and it can also import from HFS+ file system that Macs use.
It can also cross-platform FAT16, FAT32, and exFAT file systems as well. Chrome OS even supports MTP file systems used by music players and ISO9660/UDF file systems used by CDs and DVDs.
That’s a lot of file systems.
You can see how compatible your Chromebook really is. It can pretty much work with any file system whether it’s Mac or Windows but offers limited abilities for those less commonly used.
If you don’t understand what we just went over, it’s completely OK. It’s just food for thought.
Supported file types
Your device can read the following file types:
- Media: .3gp, .avi, .mov, .mp4, .m4v, .m4a, .mp3, .mkv, .ogv, .ogm, .ogg, .oga, .webm, .wav
- Images: .bmp, .gif, .jpg, .jpeg, .png, .webp
- Microsoft Office files: .doc, .docx, .xls, .xlsx, .ppt (read-only), .pptx (read-only)
- Compressed files: .zip, .rar
- Other: .text, .pdf (read-only)
You can find out more information about supported file types from Google’s page here.

How to connect an external hard drive, flash drive, or SD card to your Chromebook
So, you’ve connected your USB device or SD card to your laptop and nothing happens. Here’s how to make something happen.
(Not sure what type of storage to get? Looking for the best one? I wrote a guide that compares the pros and cons of external drives, flash storage, and SD cards.)
If you haven’t already, plug in your USB device now.
Step 1: Click on the Launcher circle on the bottom-left corner of the screen. You can also press the “Finder Key” on your keyboard, which is a magnifying glass (where the “Caps Lock” key is on a traditional keyboard.)
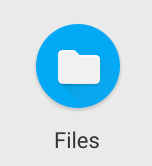
Step 2: A window will pop up with all your installed apps. Look for the “Files” app. It’s literally an icon of a white folder with a blue background.
It looks like this:

If you don’t see it, you probably haven’t used it recently. Click on “All Apps” or simply search for “files” in the search bar. It’s not difficult to find it. And it can’t be uninstalled, so don’t worry if you thought it got deleted because it can’t.
Step 3: Open the Files app. It’s literally an app that displays all your saved media on your local storage. This is the storage that’s built into your Chromebook (you know, the 16 or 32GB of space).
Step 4: Look on the left sidebar for an external drive you’ve connected to your laptop It should be right under the “Downloads” section and it should have a name that’s somewhat recognizable. It’s whatever your manufacturer named it.
Step 5: Click on the device and explore it. When you click on it, it should open up just like a file explorer on Windows or Mac like you’re used to. You can see all the files saved on the device (or whatever storage device you’re using) in a listview.
You can sort, search, copy, paste, delete, and more using the functions in the top-right of the file explorer. You may be limited to what you can do depending on the format of the hard drive, thumb drive, or SD card you’re using.
And, of course, you can open up any supported file type by double-clicking on it.
How to transfer files to your Chromebook
Moving a file to your Chromebook from an external drive, flash drive, or SD card works the same way.
Here’s how:
First, connect your USB device or SD card to your laptop if you haven’t already.
Step 1: Open up the Files app and go to your external storage device just like you learned how to do in the steps above. If you skipped them, just read them over real quick.
Step 2: Navigate to your “Downloads” folder by clicking on it on the left-hand sidebar. This is where your local stuff is stored, like the stuff you download from the ‘net.
Step 3: Okay, so now that you know where your files are, you have two options to transfer a file to your laptop now.
Method #1: Copy and Paste

This is probably the easier method.
- Simply go into your external storage folder
- Find the file you want to transfer
- Select the file by clicking on it once
- Press “Ctrl + C” to copy it
- Go to your Downloads folder
- Press “Ctrl + V” to paste it
You can select multiple files by clicking and dragging to move the selection area.
You can also hold “Ctrl” and then click to select multiple files if dragging a selection area doesn’t work. For example, if you want the first file and the last file in a list of files, but don’t want to select any of the files in the middle.
- If you want to select all files, press “Ctrl + A” and it’ll automatically select them all.
- If you want to select a range of files, click on one file, and then press “Shift” and click again on another file. Chrome OS will select a bunch of files from where you first clicked to the current position of your cursor.
Method #2: Dragging files

This is the other option is simply dragging files from your storage to your Chromebook.
This is accomplished like so:
- Go to your external storage folder
- Find the file you want to move to your laptop
- Click on it and drag it to your Downloads folder on the left sidebar
This works the same way as copy and pasting files. You can select multiple files and transfer them over the same way. I just prefer copy and pasting because it can be difficult to click and drag on a touchpad since I’m so used to desktops, but it may be easier for you. Experiment and find out what works best for you!
Hot tip: If you want to transfer files over to your device and delete them from the external drive or SD card simultaneously, use the Cut feature.
Simply use “Ctrl + X” to cut, then “Ctrl + V” to paste. It’ll automatically delete the original file and paste it in your Downloads folder.
Transferring from your Chromebook to your hard drive?
Note that this works both ways. You can transfer files from your Chromebook to your external hard drive, flash storage, or SD card doing the reverse.
For example, instead of copy and pasting from your drive’s folder to the Downloads folder, you’d do the opposite. Copy and paste from your Downloads folder to your drive’s folder. Same goes for dragging or cutting. It’s easy, no?
When you’re done transferring files…safely remove hardware!
After you’ve finished moving your files around and everything is fine and dandy, you’ll have to do the dreaded task- safely eject your hardware.
Whether you’re used to Windows or Mac, you’ll have to tell your laptop that you’re done and you’d like to eject the external device or SD card. If you don’t, Chrome OS will give you a notification saying that your files can become corrupt in a humorous way. (If you want to try it, I suggest using a blank storage.)
So, how do you safely remove a device from your Chromebook? Simply click on the eject icon shown to the right of it in your Files app in the left sidebar.
It’ll then disappear from the list, and you’ll know it’s ready to remove.
You’re now a hardware ninja

Well, that’s it.
Now you should know how to connect an external hard drive to your Chromebook, how to transfer files to and from one, and how to safely eject your devices from your laptop.
If you’ve found this helpful, consider telling one other Chromie. They may just thank you for it and give you a Chrome hug.
If you have any other tips or have any problems, let me know in the comments and I’ll get back to you.
Thanks for reading!
[the_ad id=”2593″]


what if you want to upload it onto ur drive
Really useful and helpful information for a newbie Chromebook user…
Hey Sue,
Thanks for the kind words. This is why I write =].
If you have any questions, let me know and I’ll get back to you ASAP.
Thanks.
Thank you ! This is the best info I’ve come across addressing this issue ! However, I left my mem stick in chromebook in overnight and today it’s no where to be found. Does that mean chromebook closed it automatically and now I can safely remove it ?
Hey there,
Yeah, I wouldn’t worry too much about it. You should be able to remove it safely without any problems.
Just be sure that you’re not actively saving or transferring anything to/from it when you remove it.
You may get a little pop-up notification warning you about removing it without safely ejecting it, but you should be okay. I’ve done it plenty of times without any data corruption.
And thanks for the kind words. This is why I write =].
Let me know if you have any other questions.
Thanks.
Thanks again Andy !
No problem. Glad to help =].