So, you want to connect your Chromebook to an external CD or DVD drive.
Well, you’ve landed on the right page.
In this tutorial, we’ll go over how to get your Chromebook to connect to an external CD/DVD player.
The whole process is pretty easy and should take less than an hour to set up. Anyone can do it.
By the end of it, you’ll be able to play music CDs, DVD movies, rip music, burn CDs, and do whatever else you want on one of the most popular storage mediums on the planet- the optical disc!
Ready?
Let’s dive in.
Last updated: 2/26/23. This tutorial has been updated for 2023 based on user feedback. CD/DVD drives are quickly becoming obsolete. But some of us have a collection or store things on physical medium.
Want a Chromebook with a CD/DVD drive?
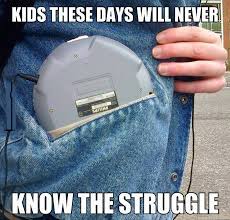
As you probably know, Chromebooks don’t have optical drives.
Not a single one exists on the market. Not one.
But it’s not just Chromebooks. Many manufacturers for laptops such as HP, Dell, Lenovo, Acer, and ASUS have all abandoned adding a built-in optical drive for their laptops.
Why?
Everything’s gone digital
With digital downloads, digital software, cloud storage, and even subscription-based digital software access, there’s no longer a real need for physical media- specifically CD or DVDs.
This format is quickly becoming obsolete and replaced with digital everything.
It’s just like the cassette tape was rapidly replaced with CDs, so there wasn’t a need to build cassette players anymore. Now, CDs and DVDs are being replaced with digital software, so there’s no real need to add an optical drive to a Chromebook, or any modern laptop, for that matter.
From a typical consumer’s perspective, it makes sense. A lot of music nowadays is easily purchased in a digital format and added to a digital library (i.e. iTunes). There’s no chance of losing the music purchased.
There’s no need to organize a giant collection of music CDs. There’s no need to waste time mixing a CD when you can do it all digitally and instantly.
From a manufacturer’s perspective, it also makes sense. Building Chromebooks (or any laptop) without optical drives saves them money, looks hip and modern, and also allows them to build lighter and thinner laptops.
So the push to digital storage makes sense for the majority of the market. This makes sense to try to get your new laptop connected to older media.
But for those who have a library of DVDs, CDs, or movies, being able to play them on your laptop is imperative. Whether you’re the type that prefers physicals discs or like making backups on solid media, this guide is for you.
Chromebooks don’t have optical drives
Therefore, with Chrome OS being built for the newer generation, you won’t find a Chromebook with a CD, DVD, disc, or optical drive anywhere.
They’ve pretty much adopted Apple’s approach.
- Why build a Chromebook with a CD drive when you can use Google Play Music?
- Why build a Chromebook with a DVD drive when you can use Google Movies?
- Why build a Chromebook with an optical drive when you can save money over obsolete hardware?
- Why build a Chromebook with a disc drive when you can make a thinner and lighter laptop?
It just makes sense to abandon the optical drive.
Of course, some of us still prefer to play music from our massive CD collections. Or rip and burn our own music CDs. Or maybe even access our saved movies, pictures, and music on CD or DVD storage.
Or maybe we just like holding the actual disc. Whether this is the awesome cover art, lyric manual, or other memorabilia, it definitely feels better to purchase something you can actually hold on to.
For us old-schoolers (including me), that’s when this whole “abandon the optical drive” movement causes problems.
Thankfully, there’s a way to get around it all. In this tutorial, we’ll go over how to connect your Chromebook to an external CD or DVD disc drive.
This may work for a small percentage of users desperate enough to try anything to get their laptop to recognize their disc media. But don’t your Chromebook to recognize external USB drives so easily. Chrome OS can’t. Linux is your only option. Plus some driver installs.
Then again, this method isn’t guaranteed to work- at all. Some will have success with enough messing around, but others won’t. Don’t expect this to be an easy plug-and-play kind of setup, because we’re literally hacking our way around Chrome OS to get it to play CD/DVDs when it wasn’t built for that.
Because they don’t have built-in optical drives, this means a creative workaround is needed to get them to read traditional discs.
How to use an external CD/DVD drive with a Chromebook
As you probably guessed by now, you’ll need an external CD or DVD player in order to make this work.
This may seem daunting to choose out an external disc drive that’s compatible with a Chromebook, but it’s actually not that difficult.
As you know, Chrome OS doesn’t work with external disc drives. You can try plugging in your USB-powered CD or DVD drive to your Chromebook, and absolutely nothing will happen. Chrome OS doesn’t read or write to external players because it doesn’t have the proper codecs and drivers to recognize them.
This is likely due to the push towards everything digital, so that’s why your Chromebook isn’t compatible with any external player by default.
So you’re probably wondering, how are we going to connect a Chromebook to an external drive if it isn’t compatible with it in the first place.
Linux will allow you to use an external drive
This is because we won’t be connecting it to Chrome OS.
We’ll be using Linux.
I won’t go into a whole discussion about what Linux is. I’ve already written a very detailed tutorial about installing Linux which you can check out if you’re interested.
In a nutshell, Linux is a free, open-source kernel that’s widely used among enthusiasts in the computer world. It’s basically another operating system (just like Chrome OS), but it has the ability to read and write to external CD or DVD players.
In fact, Chrome OS is built off of Linux. Linux is a very secure platform (free from viruses and malware) and is completely free to use. This is why Chrome OS is also very secure and why antivirus for Chromebooks doesn’t exist.
You’ll need a USB-powered external CD/DVD player
If you already have one lying around, I suggest you try that one out first before actually purchasing one.
If not, you’ll have to buy one that works with Linux. Any external disc drive that’s made by a leading branch should work just fine.
As long as it connects via USB and isn’t too outdated, it should connect to your Chromebook without any problems.
Get the best external drive for Linux
Buy one that suits your purposes:
- If you’re just going to play music from a CD, an external USB CD player will do just fine.
- If you want to rip, burn, and play CDs, you’ll need an external CD-RW drive.
- If you want to just watch DVDs, a basic external DVD player with do the trick.
- If you want to burn and watch DVDs, you’ll need an external DVD-RW drive burner.
If you want some recommendations that I’ve had success with, here they are:
External CD drive
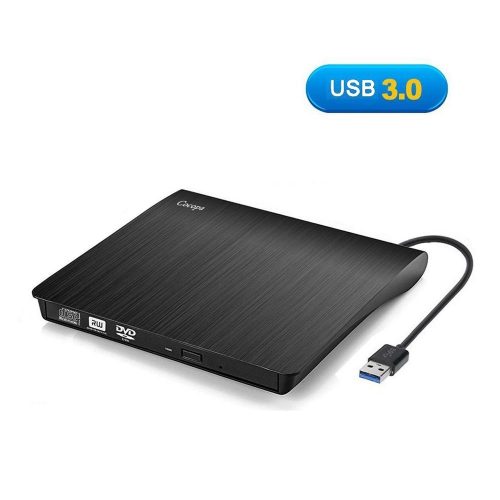
I use a basic off-brand drive (I know, I’m kind of contradicting myself), but it works just fine with Linux and I’ve never had any issues with it connecting to my Chromebook.
It a generic CD/DVD (RW) drive that’s powered by a USB 3.0 cable so I can take advantage of the read/write speeds. It’s cheap. It works. It does the job.
You can see it on Amazon here.
External DVD drive
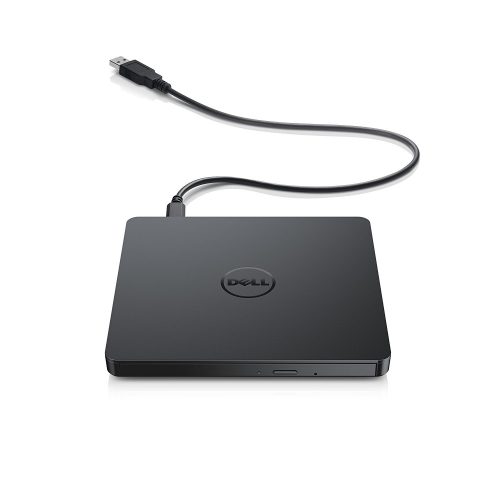
This goes to the Dell DW316 slim optical drive. It’s probably the most portable external drive I’ve used so far.
Given that my Chromebook is a portable device, it’d make sense to get a portable drive to go with it as well. I’ve tried using some off-brand external drives and they work, but they’re heavy and bulky so it’s a pain to deal with them on-the-go.
The Dell DW316 has no issues with Linux Ubuntu that I’ve come across so far and just works. Plug it in via USB and Linux will detect it immediately.
You can check it out on Amazon here.
If you want to play DVDs on your Chromebook, you may need a special license
One thing worth noting is that if you plan to play DVDs with your external drive, it may not work. DVDs are specially coded in a way that requires you to purchase a license fee in order to play them.
This may sound ridiculous, but DVDs are formatted in a way that only a special codec can decode them in order to play them.
If you’re using an external DVD player, it still won’t play them without the proper codec installed on Linux, which would make it not free like it is now.
In some countries, you’ll have to pay a $20 licensing fee in order to get this codec.
You can also buy a DVD player like Fluendo that has this licensing taken care of.
For other countries, where it’s permissible by law, you can type a few lines of code to install restricted codecs.
Again, you need to do your due diligence and be sure you stay within permissible law. It’s illegal to enable restricted codecs in specific countries.
You can refer to this article for more information.
This only applies to playing DVDs from your player. Burning DVDs is okay. Playing, ripping, and burning CDs is completely fine as well.
Okay, so now that we have the necessary hardware out of the way, we can get to the actual tutorial.
Let’s get started.
How to connect an external CD/DVD player to your Chromebook
This will consist of a few separate steps.
Complete them in order and you’ll have a Chromebook with an optical drive in about an hour from now.
If you get stuck, leave a comment and I’ll get back to you ASAP.
Back up your data
Doing this entire process will require a complete wipe of your Chromebook.
This means you’ll lose everything saved on it. Your device will essentially Powerwash itself, which will restore it back to factory settings like when it was brand new.
This means all your data will be erased during a Powerwash, including:
- Everything in your Downloads folder
- All custom folders and directories you’ve created
- Your Chromebook settings
- Your installed Chrome Web Store apps
- Your installed Google Play Apps (if applicable)
Basically, your device will be as if you just got it. Everything will be erased.
Note that your Google Account won’t be touched since it’s saved on Google’s servers and is a cloud-based account. This means all your apps you have installed on the Chrome Browser won’t be deleted.
Also, your Drive, Gmail, Docs, and whatever Google Products you use will also be just fine.
It’s only the data you have saved on your Chromebook that you need to back up.
I’ve written a complete tutorial on how to back up your Chromebook you can check out.
Go ahead and start saving your stuff (if you want to). It shouldn’t take that long.
When you’re done, continue here with the guide.
So now that we’ve gotten that warning out of the way, we can get started with the actual process.
Enable Developer Mode
Developer Mode (Dev Mode) is required in order to install Linux.
It’s basically the “unlocked” version of your Chromebook which allows you to do more administrative stuff like playing around with the latest Chrome features.
For our purposes, we’ll be using it to install Linux. But after you’re done, feel free to mess around with it. I mean, if you ever screw something up, you can always just POwerwash your system and it’ll restore itself to like-new settings.
So, to turn on Dev Mode, you’ll have to just press a few keyboard combinations:
Note: If you haven’t backed up your stuff, do it now. There’s no going back once you start.
Here’s how:
Step 1: Press “ESC + Refresh + Power” and hold all three keys until your Chromebook reboots. You’ll see a warning screen.
Step 2: At the warning screen, read the text and then press “CTRL + D” to enable Dev Mode.
Step 3: Press Enter.
Step 4: Wait for it to switch to Dev Mode (15-20 minutes).
Step 5: Read the prompts again and keep OS verification OFF. Don’t press the spacebar. And don’t let it idle. If you do, it’ll revert back out of Developer Mode.
Press “CTRL + D” or whatever is prompted to keep your Chromebook in Dev Mode.
You’re done! You’re now in Dev Mode.
Note: Whenever you restart or wake it up from sleep mode, you’ll see the warning screen saying that System Verification is OFF.
You want to keep it off by pressing the right keyboard combination. If you press the wrong buttons or let the timer run out by leaving it idle, it’ll automatically reset to normal mode and switch you out of Dev Mode.
If this happens, you’ll have to put your Chromebook back into Dev Mode again. You want to stay IN Dev Mode.
If you get stuck, you can refer to this detailed tutorial on enabling Developer Mode.
After Dev Mode is enabled, your Chromebook should now be wiped and is ready for Linux.
Download Crouton
Crouton is a file that’ll allow us to download and install Linux on your Chromebook.
This is necessary in order to connect an external disc drive because Chrome OS won’t recognize it- but Linux will.
You can download Crouton here.
Note: After you download it, be sure it’s saved to your Downloads folder. This is the default folder that everything you download from the Internet. Considering that you just did a Powerwash, Crouton should’ve automatically saved to this default folder.
If you save it to another folder, the code in the later steps won’t work. So either move it to the Downloads folder, or adjust the code to match your custom folder.
You should probably also skim over the Crouton FAQ page.
It covers a lot of good information that could seriously help you out if you get stuck. It also talks about some of the terminology involved in the Crouton language- such as a “chroot” and whatnot.
I’ll try to keep this guide as simple as possible without using any special words so first-timers won’t get confused =].
Install Linux
By the time you’re done with this tutorial, you’ll have both Linux and Chrome OS running at the same time on your Chromebook. In other words, you’ll be dual booting.
This is pretty cool because Linux is a very versatile kernel. Everything you can’t do in Chrome OS, you can switch over to Linux to finish up.
Linux has a lot of capabilities beyond just playing CDs and DVDs. It can play games like World of Warcraft and even run native Windows apps.
There are tons of Linux distros
Linux comes in a variety of flavors.
There are literally dozens of versions and desktop environments that range from minimalistic and speedy to fleshed-out and packed with functions.
It also comes with a bunch of different “modifications” you can use to customize your Linux installation.
For example, if you have a touchscreen Chromebook and you want to be able to use the touchscreen while you’re in Linux, you’ll have to modify the code you input in this step.
If this is you, you may want to check out this tutorial on installing Linux. It’s complete and goes pretty in-depth covering all that stuff.
Get the right driver
Depending on your distro, you’ll have to get the right drivers for it to recognize the external disc drive.
Do a search for your drive’s make/module and see what you can find. Then install it to your Linux distro. Drivers are necessary if they’re not pre-installed (which most likely won’t).
They allow your OS/kernel to recognize the drive and communicate with it.
Even if you have the DVD drive, VLC player, and Linux, it’s useless if they can’t talk to each other!
There are tons drivers online. And they all update over time (albeit less now since they’re becoming obsolete). Therefore, I can’t list them all here for you.
Typically, you can downloads drivers from the manufacturer’s site. They release one driver for each model (whether it’s DVD, CD, or Blu-Ray). Optical drive drivers are easy to find if you search for them correctly. For example, here’s one for ASUS.
Search “your drive model + manufacturer + driver” online for it.
We’ll be installing Ubuntu with Xfce
If not, then let’s go ahead and install a simple, bare-bones version of Linux called Ubuntu.
We’ll be installing Ubuntu with the Xfce desktop environment, to be exact.
At this point, you should Croton already downloaded in your Downloads folder.
Here’s how to install Linux:
(Don’t include the quotations when you type in the lines of code. And case matters.)
Step 1: Log in to your Google Account if you haven’t already.
Step 2: Press “CTRL + ALT + T” to launch the command prompt.
Step 3: Type “shell” and hit Enter.
If you get an error that reads:
“ERROR: unknown command: shell”
It means you’re not in Developer Mode. You need to either enable it correctly or enable it again (because Chrome OS has a habit of reverting back out of it).
Step 4: Type “sudo sh ~/Downloads/crouton” and hit Enter. (Thanks to Daniel for pointing that out!)
Step 5: Answer the on-screen prompts as they appear.
Step 6: When it asks you to create a username and password, choose a password that’s secure, but easy to remember. WRITE IT DOWN. Somewhere. Anywhere.
If you forget, you’ll have to start all over. It could also lead to all sorts of issues later down the line if you don’t remember it or forget it, so be sure to jot down your password.
Step 7: After Linux is done installing, launch it by typing “sudo startxfce4” and hitting Enter.
Step 8: Congrats. You’re now in Linux on your Chromebook!
Note: Whenever you restart, boot up, or otherwise power up your Chromebook, it should automatically boot to Chrome OS (assuming you’re in Developer Mode).
You can switch between Chrome OS and Linux Ubuntu by pressing the following hotkeys:
- Switch to Chrome OS: “CTRL + ALT + SHIFT + Back Arrow.”
- Switch to Ubuntu Linux: “CTRL + ALT+ SHIFT + Forward Arrow.”
Note: The Back/Forward Arrows the arrows on the top row of your Chromebook’s keyboard (where F1-F12 are on a traditional Windows keyboard), not the ones at the bottom. The commands won’t work if you use the wrong set of arrow keys. So be sure to use the right ones!
So there you have it, you’ve successfully installed Linux on your Chromebook.
Now, we can move on to connecting your external disc drive to your Chromebook.
Connecting your drive to your Chromebook
It’s easy. Just plug it in.
Step 1: Boot up your Chromebook and switch to Linux (“CTRL + ALT + SHIFT + Forward Arrow”).
Step 2: Plug in your external CD or DVD player to your Chromebook via USB.
Step 3: Ubuntu should automatically detect it and ask you what you want to do with it.
You should be able to access your external disc drive by navigating to it. Just hit the Ubuntu button and go to “Disks” or search for it in the search field.
If you don’t see it, skip to the troubleshooting section.
Playing, ripping, and burning audio CDs
So you’ve successfully connected your CD drive and now you want to play the music on it.
It’s super easy to do so. There are a ton of audio players for Ubuntu out there, but I’ve listed two of the best music players that are straightforward and easy to use. Here they are:
Banshee
Banshee is probably the most popular media player for Ubuntu.
It plays music, videos, Internet radio shows, and pretty much any multimedia you can throw at it. It works just as you expect it to without needing any additional files. It’s literally just press a button and your media will play.
It’s also cross-platform and works with Microsoft, Mac OS, and Linux and is released under MIT license. It’s lightweight so it doesn’t take up too much system resources and it syncs flawlessly with your smartphone and other media players as well.
You can also update the artist name, album name, and more right on the spot.
Read more about Banshee here.
Here’s how to install Banshee on Linux:
Step 1: Launch the command prompt in Linux by pressing “CTRL + ALT + T” and hitting Enter.
Step 2: Type “sudo apt-get update” to update your Linux repos. This is always good practice before installing software.
Step 3: Type “sudo apt-get install banshee” and your Chromebook will begin to install it.
Step 4: Wait patiently.
After it’s installed, you can find it in your Applications menu. Just look for it. Or use the search bar to search for “banshee” after you click on the Ubuntu icon.
You’ll see a search field there and you can search for it.
VLC
VLC media player is another very popular media player that can play audio CDs.
It’s comparable to Banshee but offers a bit more functionality. You can easily create playlists, seek media, sync to other devices, and play radio stations live. It can do everything Banshee can do plus a little more for advanced users.
You can read more about VLC here.
Here’s how to install VLC on Linux:
Step 1: Launch the command prompt by pressing “CTRL + ALT + T” and hitting Enter.
Step 2: Type “sudo apt-get update” to update your Linux repositories.
Step 3: Type “sudo apt install vlc”
Step 4: Wait for it to install.
Both of these media players are pretty easy to use.
You can refer to their official support pages for more information:
Playing DVDs
Okay, so as I stated earlier in this tutorial, playing DVDs without a license is indeed an illegal practice depending on your country’s laws.
If it’s legal for you to play DVDs in your specific country, you can easily install some code in Ubuntu so it’ll play DVDs without a problem.
You can reference this page and this page to install the necessary codecs to play DVDs.
Linux not recognizing your drive?
You may have some issues getting Linux to recognize your external drive.
Here are two of the most common ways to fix the problem.
Mount the external drive
Step 1: Launch the command line by pressing “CTRL + ALT + T.”
Step 2: Type “lsblk” and hit Enter.
Step 3: Look for your device in the list. This will show you where it’s currently connected. Note the name of it under “NAME” and write it down. It should be something like “sd1” or “sd2.”
Step 4: Make a directory for your external drive by typing “mkdir ~/discdrive” and hit Enter.
Step 5: Mount it by typing “sudo mount /dev/YOUR_DEVICE_NAME ~/discdrive” and hit Enter.
Step 6: It should now show up in your Disks menu.
If you don’t see the disk drive show up at all after hitting “lsblk,” it may be defective or unrecognizable. This is rare and only happens with an old disc drive.
Update Linux
Or you may need to update your version of Ubuntu:
“sudo apt-get update”
“sudo apt-get upgrade”
“sudo apt-get dist-upgrade”
Try updating your copy of Ubuntu and seeing if that fixes the problem and recognizes your USB drive.
Did you screw up?
If you mess up, don’t worry about breaking anything.
Just do a Powerwash and your Chromebook will be restored back to new again. You can start over easily and try again.
Sure, it may be annoying to start from the beginning, but at least it’s a fresh start and you’ll learn something. It’s new and exciting!
That’s the best part about Chromebooks. You can start over from scratch without breaking anything.
Are you now playing CDs and DVDs on your Chromebook?
Well, that’s about it. You did it!
You should now know how to connect an external DVD or CD drive to your Chromebook by using Linux!
That’s it. It’s pretty easy if you think about.
It wasn’t that bad at all, right?
We needed to install Linux to get around Chrome OS. It requires a few more steps but you’re now free to do a lot more with Ubuntu than playing CD/DVDs. Your Chromebook now has a ton more capabilities than before.
You can almost do anything it that you can do on a Windows or Mac with Linux.
You can even play games like League of Legends, get Steam, and even install Kodi on your Chromebook as well.
If you have any questions, leave a comment and I’ll try to get back to you ASAP.
Also, if this guide has helped you, let me know as well =]. Consider telling a friend who may benefit from it!
Thanks for reading.



Alot of good information on this blog, thanks!
I followed your step by step on my Chromebook. However once I downloaded Linux Ubuntu 20.04 I wasn’t given the opportunity to create a password. I tried every command I found on line, it kept telling me it didn’t recognize the command. Believe me I tried for hours & hours. Even repeated the powerwash & redownloaded. Still NOTHING. So I simply Power Washed the new Chromebook again & took it back, where I bought it from. Every time I tried to ask Linux, even though I’d set up an account, I was told I wasn’t allowed to comment, I had 2 more steps, to complete. Yet they sent me plenty of emails. Each time I tried to get info, got the same response, after using the links they emailed me. So I unsubscribed. After all was said & done, I bought a different computer, + Windows 7 Pro OS. (Actually got both for less than the NEW ASUS Chromebook. Actually ASUS emailed me saying they do their best to insure my satisfaction, blah, blah. But they did tell me I was out of luck. Too bad so sad. So I returned their Google laden browser back to the store. Thankfully I’m getting tons of Porn Ads from Google Classroom or whatever it is. I can’t uninstall it from my phone as I never installed it there in the 1st place. I block the ads that come in my regular email, but it’s spam, mostly. Great idea, don’t buy a glorified Google web browser.) Sorry so negative, but it’s been a total pain.
Can I just use the linux in settings that you enable? I already have it enabled so it would be a lot more convenient. Thanks.
Can I just use the linux that you enable in settings?
This is such a helpful article but my main question is still unanswered, if I go through all this hassle will my chromebook play old computer games? Or just cds and dvds?
hello
really in need of some help. whenever i type in “sudo sh ~/Downloads/crouton” i get a prompt that says “sh: 0: Refusing to exec /home/chronos/user/Downloads/crouton from noexec mount; see https://chromium.googlesource.com/chromiumos/docs/+/master/security/noexec_shell_scripts.md”. i don’t get any prompt for a username or password. does anyone know how to fix this?
I’m having the same problem.. please help!!
Enter /usr/local
It will tell you it is a directory. I d9nt know how to get to the username and password from there
I’m also having the same problem.
I’m having this problem as well. Did you manage to fix it?
me too pls help
I would like to join
wish i had never bought a chrome book everything is too complicated for me also i have a life back to windows for me
So I downloaded it all fine, very clear directions. I go to plug in the external drive, it’s not recognised, then I put a disc in, it recognises it but then says “Failed to Mount” Not authorised you perform operation. Any ideas on a solution is greatly appreciated ☺️
HELP!!! linux isn’t recognizing my external dvd drive. i tried to follow the troubleshooting tips and its saying that lsblk is an unknown command. Can anyone help me? I’ve already made sure my version is up to date.
do I HAVE to use Linux..? this seems like a stupidly long process for some video. I have a lot of data save on here that i can’t just wipe. i already bought the dvd external drive, wtf?? why can’t i just do something simpler. why do i have to download all of this nonsense??
I have 2 issues. The first one is when I come to the admin/pswd section … I can set an admin name but it won’t let me put a password. It just seems to bypass it altogether. Then when I get into the program I cannot update and get the latest version, and there is no Ubuntu option. I get completely lost from here. Nothing happens when I plug the usb in. I just want to burn some lame home videos on this damn chromebook, lol! Please help!!
ok i admit im very dense….if i go to staples and buy a external hard drive which one do i buy so i can record off of youtube… you help is much needed thank you
Are you kidding me? I have to install a whole new OS in order to use a CD/DVD drive. Or go through the gyrations of Dev mode. No thanks. I’ll just use Windows for that. Bleeping short sided and stupid.
Downloaded banshee to play my DVD R but it won’t play.
I have lost all faith in Dell. I bought an Alienware laptop only to find that there was no way for me to rip a .wma CD onto the hard drive. I am furious. I do not want anything to do with “The Cloud” nor do I want to RENT storage space.
So what gives? I have hundreds of CD’s that I’d like to access. What can I do?
Hi folks…I’m super excited to do this and burn my old cd’s with the chrombook…but I got stuck. when i enter “sudo sh ~/Downloads/crouton” it gives a list of definitions and then returns to he command prompt “chronos@localhost”. I don’t get any prompts for making a password. Help please!
hi everyone,
mayfield4 i seem to be having the same problem as you! Have you managed to slove this issue yet?
after typing shell and hitting enter, type sudo sh ~/Downloads/crouton -t xfce
It will run installations for about 15 mins, then it will ask for a username and password
I should have read these comments BEFORE starting this process. This is where I am now stuck! Now what the heck do I do with my computer stuck in limbo!!!!!
Thanks so much for this instructional! I got as far as searching for the disc by typing “lsblk”. When I do that I show this:
vda 254:0 0 244.4M 1 disk /opt/google/cros-containers
Then I typed mkdir ~/discdrive and got the reply:
cannot create directory ‘/home/robinmknight/discdrive’: File exists
So I guess I’m not surew hat to do from here, because nothing is recognizing my disc drive when I plug it in, despite it showing up when i type lsblk.
Any advice you have would be much appreciated! Thank you!
Greetings,
I get stuck during the initial stage of downloading linux. It doesn’t give me an error message however a bunch of writing appears and it warns me about “inherently insecure” dev mode is. It then returns to the prompt “chronos@localhost”. Can you help?
– Tekeenya Price
I have the same problem…i just posted the question above…maybe we’ll get some help?!
I’ve tried this several times, installing Linux several times and I cant get any video to play using Banchee and VLC.
All that work… and when I tried to use it this morning I could not switch to Linux. Back to the drawing board, I guess.
Dear Sir, I have recently bought a new Acer Chromebook R11. I was looking to be able to play cds/dvds from a external drive. that I have just now purchased. I Thought I would be able to simply download the VLC extension from Chrome. Wrong…! There seems there is a Lot more to it. After reading your article, which was VERY WELL done, there is much more to it.
The first question that I have is, is it Safe to do so. I don’t want to mess up a brand new chromebook.
I Really don’t want to Powerwash this thing. Can I use the VLC app instead of the Banshee the you recommended? I like your instructions because they are Step-by-Step. Love those directions. Thanks so much for your input and help. Harold.
Hey Harold,
Yes, you got that right!
Connecting an external drive to a Chromebook is no joke and a (pretty involved) process. It’s nothing like Windows.
The reason it needs to be Powerwashed is because Chromebooks won’t accept external drives (or even third-party programs – you can’t “install” anything on a Chromebook). So the way to get around this is to get Linux. And to get Linux, it needs to have Developer Mode enabled. And to enable Dev Mode, you need to do a Powerwash. So that’s why it needs to be wiped.
It won’t damage the Chromebook, but rather reset it back to factory conditions (like when you first turned it on). It’s completely safe and reversible, but it will erase anything you have saved on it (Downloads folder, settings, wallpapers, etc.). You can back all this data up.
All your Google Account information (Gmail, Drive, etc.) will remain safe.
However, the process isn’t guaranteed to work. There are always problems, bugs, and updates which mess things up. Unless you really need to connect a DVD/CD drive to your Chromebook, and you’re willing to work for it, I would advise against it because it’ll take time, energy, and probably a lot of headaches!
But then again, if you mess up, you can do a Powerwash and start over at any point you like. Powerwashing is a good thing! You can read more about Powerwashing if you’d like.
Again, the choice is up to you and it really depends on how bad you need it. The result isn’t guaranteed and it’ll require some work.
If you have any other questions, please let me know. And thanks for your kind words =].
Regardless, I hope you enjoy your new Acer R11. That’s a solid choice.
Hey Andy, Thanks so much for your detailed explanation and confirming Many of the things that I feared were true. I already have a separate CD boombox and a DVD player that is ( of course) is connected to my TV. After reading your response, was enough for me to say, The Heck with it and forget this idea.
It was a task trying to figure out how to configure a VPN and download torrents on this Chromebook. I did succeed in that. Enjoy the Holidays and Thanks again. Harold.
Hey Andy, Thanks so much for your Very Detailed explanation. I already have a CD boombox and a DVD player( of course ) connected to my TV. You really confirm my fears about going through this process about this dvd drive. Just to Heck with it. It was a task just configuring a VPN and downloading torrents. I succeeded in that. Have a great Holiday and Thanks again. Harold.
No problem! Easy is always better =].
Let me know if you have any other questions. And happy holidays to you, too!
Thanks.
Andy
I decided to follow your advise on how to connect a cd drive to my Acer Chromebook by downloading linux. Right off the bat, step one, I am to press “esc + refresh +power
Hey Harlan Wayne Snyder,
Yes, did it not work? Some older models have a physical switch you need to toggle in order to enable Dev Mode. Or you could try powering the system off then pressing “ESC + Refresh + Power Button (twice)” and see if it works.
Let me know if it doesn’t work.
Thanks.
Sorry Andy I somehow sent that post before I finished it. Now for the rest of the story. I have decided to download Linux in order to connect a cd drive. I have a Acer Chromebook and when I open the lid it powers up. I have no power key for step 1 to “esc + refresh + power” as you suggest. Am I out of luck or any ideas? thanks
Hey again,
Some of the new Acer Chromebooks use the “lock” key as the power button. It’s the key on the top-right corner of the keyboard. If you have a convertible (converts between laptop /tablet), it’s on the side next to to the audio jack.
If you still can’t find it, let me know the model number and I’ll look it up for you.
Thanks.
Heavens! I appreciate the work you put into this Andy Z. but it’s doing a good job of ‘unselling’ Chromebooks for me! I’ve got some background and could do it, but installing a new OS to use a device is something else. And it would apply to pretty much ‘all devices’ as far as I can see, e.g. I have a fairly old Roland Edirol box for hooking high quality mics to computers via USB , guess I can forget about that on a Chromebook. Anyway, I’m rambling 😉 Thanks.
Hey Peter,
No problem =]. It does take quite a bit of work and strays far from the “plug and play” mentality most of us are accustomed to! After getting a ton of reader requests, I just had to put a small tutorial together. I guess eliminating all the hardware to simplify something and keep it simple makes it a little too simple in some respects. Heh.
Thanks for your comment. It’s well-appreciated!
i really really need healp. dont know if i need to go to another site. ive gotten this far, and when i go to do the sudo sh~/Download/crouton -t xfce it says its not found. i really need help, like asap.
Hey Samantha,
If it’s not found, try going into the folder and deleting the Crouton file. Then download the file again and try running the command.
If you still get an error, try following this guide exactly:
https://github.com/dnschneid/crouton/wiki/Common-issues-and-reporting
It should fix the issue. Let me know if you’re still stuck!
Thanks.
i cant figure out the name of the chroots. and when i am trying to do the list of them, its still saying not found. its like i am almost there. but i dont know a chroot name to put in the last field to do.
my reply didnt send. im following to the letter, but when i go to find a local chroot name like it says, it still says command not found. its so frustrating.
Hey Samantha,
Is Developer Mode enabled properly? If you launch the command prompt (“CTRL + ALT + T”) and type “shell” do you get an “Unknown Command” error?
Thanks.
i did the dev mode right, and when i do shell, it does not say unknown command. that one goes through. its so weird. i just want to play dvds on the portable usb dvd player i was given.
when i do shell, it says on the next line chronos@localhost / $
my thing didnt post again i dont think. after i do shell, it just goes to the next line, waiting for something to be typed. no unknown command.
Hi Samantha,
Do you think you could list a quick bullet point list of what you’ve completed so far? Has Linux been properly installed yet? Or are you having difficulty getting Crouton to run the installation?
Sorry for the delay. It’s been a long day and difficult to remember each comment across each article.
Thanks.
Instead of typing sudo sh~/Downloads/crouton -t xfce type sudo sh ~/Downloads/crouton
I had the same issue and this solved it, Andy Z. maybe you missed out on a space?
Hey Daniel,
Thanks for pointing that out! Updated the tutorial =].
Nice catch.
i really need help. i type the sudo line after shell and it keeps saying its wrong. i really need help!
When I try to mount the CD, I get the following error: “mount: /dev/sr0: can’t read superblock” Any thoughts? Running Ubuntu Trusty.
Hey tbrd,
Is a standard CD drive with a USB connection? Has it ever been used on another computer running Windows?
Thanks.
Hi Andy, I figured it out! Since this was a cdrom, just trying to rip the music to add to my library, I wasn’t able to mount (since cdrom’s are read only). I checked the drive in another computer and it worked fine so the drive wasn’t the issue. Instead, I needed to change the permissions on the drive once attached. My drive was located under /dev/sr0, so I ran the following command:
sudo chmod 777 /dev/sr0
That enabled the drive and I could rip the music. In crouton, I have to run this command everytime I start up if I want to use the drive, but haven’t figured out yet how to make it stick.
no, doesn’t work
Hey oi,
What step are you having difficulty with? I can try to help you out!
Thanks.